A Step-by-Step Guide to Creating a Google Sheet Assignment Tracker
By RJ Edrolin
For those who’ve tried Notion, physical planners, or just Google Calendar, sometimes it can be hard to choose and stick with a platform for that one-stop place for all your tasks. For me, since freshman year, I've created a google sheet listing out all of my assignments and deadlines for the semester and it's been a game changer.
But even with all its pros, Google Sheets can be extremely tricky to navigate. However, once you get a hang of it, it's truly the best method for a one-stop overview for all your assignments and upcoming projects. Specifically, I love being able to visually see what my entire semester is going to look like and it helps me to assess which weeks may be even busier than others. Below is a step-by-step guide on how to create a master Google Sheet Assignment Tracker.
Step 1: Format
This step has a lot of flexibility (you can change the font, font size, colors, rearrange the columns, etc.) but I usually like to structure it as follows:
Step 2: Collect all Syllabi and compile assignment due dates
This is the most tedious part when creating your assignment tracker, but the next step is going through each syllabus for your classes and adding all the assignments and their due dates to your sheet.
1st Column (Due Date): click FORMAT → NUMBER and pick which format you would like your due date
2nd Column (Class): click INSERT → DROPDOWN and add all your classes for the semester for easy adding
3rd Column (Assignment Type): type in what is specifically due that week
4th Column (Assignment Task): this is space to add more details about the assignment
5th Column (Completed?): click INSERT → CHECKBOX
6th Column (Notes): leave this open for any side notes you have for that assignment
After you collect all your assignments, color code each class!
An optional tip: I prefer to bold and put in red the assignments worth a lot of my grade for that class. It’s not only a helpful reminder, but when you scan through all your assignments for a semester, you can pick out which weeks are going to be the toughest!
Step 3: Sort all your assignments
Once all your assignments are inputted into the sheet, you can now organize it by date!
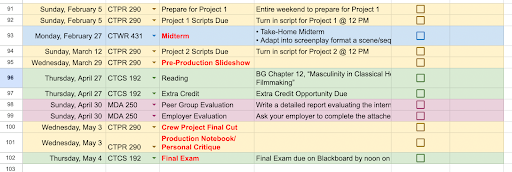
Click and drag all the cells for your assignments and then click DATA → SORT RANGE → SORT RANGE BY COLUMN A. Afterwards you should see something like this:
After this step, you’re done! Now you have a nice overview of all the assignments you have due for a semester.
Optional: Add Week Rows
Week Rows are the best way to further visualize what your semester is going to look like!
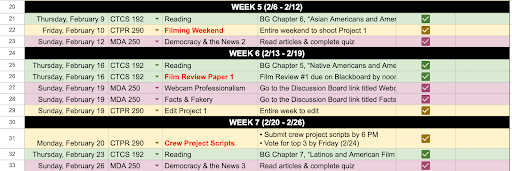
For this one, you’re going to click INSERT ROW and insert a row above and below a week. Afterwards, you’re going to create a ‘banner’ for the week, by clicking and dragging on all the cells in that row and click MERGE (photo below for reference).
The one thing I like about Google Sheets compared to the other options is that there’s a lot of flexibility to customize your sheet. Personally, I like going on Tik Tok for inspiration on what I can add to my sheet but there’s also a bunch of tutorials on YouTube and more inspo on Pinterest. Although Google Sheets can be very intimidating at first to use, once you get a hang of it, it can be extremely helpful when you need a one-stop place to visualize your entire semester!


